Most label failures are not print failures. The color is fine, the die-cut is clean, and yet the label lifts at a corner, slides on a squeeze bottle, or peels the moment a jar goes into a cooler. Nearly always the culprit is the adhesive, chosen as an afterthought once the artwork looked right. Adhesive is not a single product you either have or do not; it is a set of chemistries tuned for specific surfaces and conditions, and matching the right one to your container is what separates a label that survives the supply chain from one that arrives half off.
Why labels fail: surface, temperature, and time
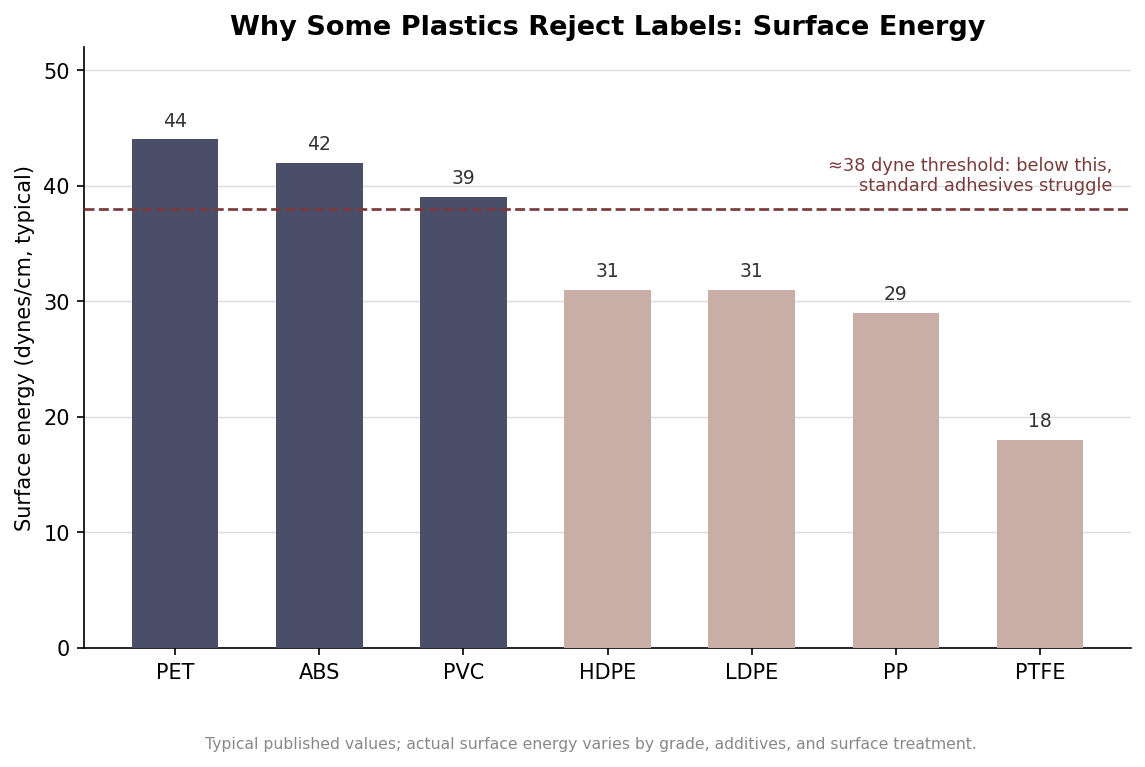
Three variables decide whether a label holds. The first is surface energy, a measure of how readily a surface lets an adhesive wet out and grip it. High-energy surfaces such as glass and metal are easy to bond. Many common container plastics are the opposite: polypropylene sits around 29 dynes per centimeter and the polyethylenes around 31, well below the roughly 38-dyne mark where standard adhesives start to hold confidently. That is why a label that clings happily to a glass jar slides off an HDPE bottle of the same product. The values below are typical rather than exact, since grade, additives, and any surface treatment shift them, but the pattern is consistent.
The second variable is temperature, both when the label is applied and where the product lives afterward. Pressure-sensitive adhesives need enough warmth to flow and wet the surface at the moment of application; apply below an adhesive’s minimum application temperature and it never fully grabs, even if the freezer it later enters is rated fine. The third variable is time. Pressure-sensitive bonds are not final on contact. Initial tack happens immediately, but the bond keeps building for roughly 24 to 72 hours as the adhesive flows into the surface, which is why a label that looks stuck at the filling line can still be repositioned an hour later and only reaches full strength a day or two on.
The everyday adhesives
Permanent acrylic is the default for good reason. It applies in a normal room, roughly 40 to 100 degrees Fahrenheit, serves from about 35 to 200 degrees, and it is UV-stable, ages well, and resists chemicals. On glass, metal, and smooth higher-energy plastics it is the sensible all-rounder for retail products that live indoors or in ambient conditions. Most bottle, jar, and box labels start here and only move off it for a specific reason.
Removable acrylic is built to come away cleanly, which makes it right for price tags, promotional overlays, returnable containers, and anything a customer or warehouse will peel. The catch that surprises people is that removable adhesives bond more strongly the longer they sit and the warmer they get, so a label meant to lift off after a week may fight you after a month in a hot store. When clean removal matters, test it at the age and temperature it will actually face. High-tack acrylic or rubber-based adhesive is the answer to the surface-energy problem above: it is formulated to grab low-energy plastics like polyethylene and polypropylene, textured and recycled substrates, and rough surfaces where a standard adhesive simply slides. Rubber-based permanents push this further with very high initial tack for the most stubborn plastics and for cold, wet, or slightly oily surfaces, at the cost of less UV stability, since they can yellow over time.
Cold, hot, wet, and oily: the specialty adhesives
When the environment leaves the ordinary range, the adhesive has to change with it. Cold-temperature acrylic applies down to around 25 to 35 degrees and serves from about 20 degrees upward, which suits refrigerated containers, chilled-beverage displays, and surfaces prone to condensation. It is built for refrigeration, not freezing. For true frozen goods you need a freezer-grade adhesive that can be applied at or near zero degrees Fahrenheit and stays flexible and tacky in service down toward minus 65, without going brittle and shedding the label. Cold-chain pharmaceuticals and frozen food both depend on it, and the temperature windows below show how much wider that span is than a standard permanent.
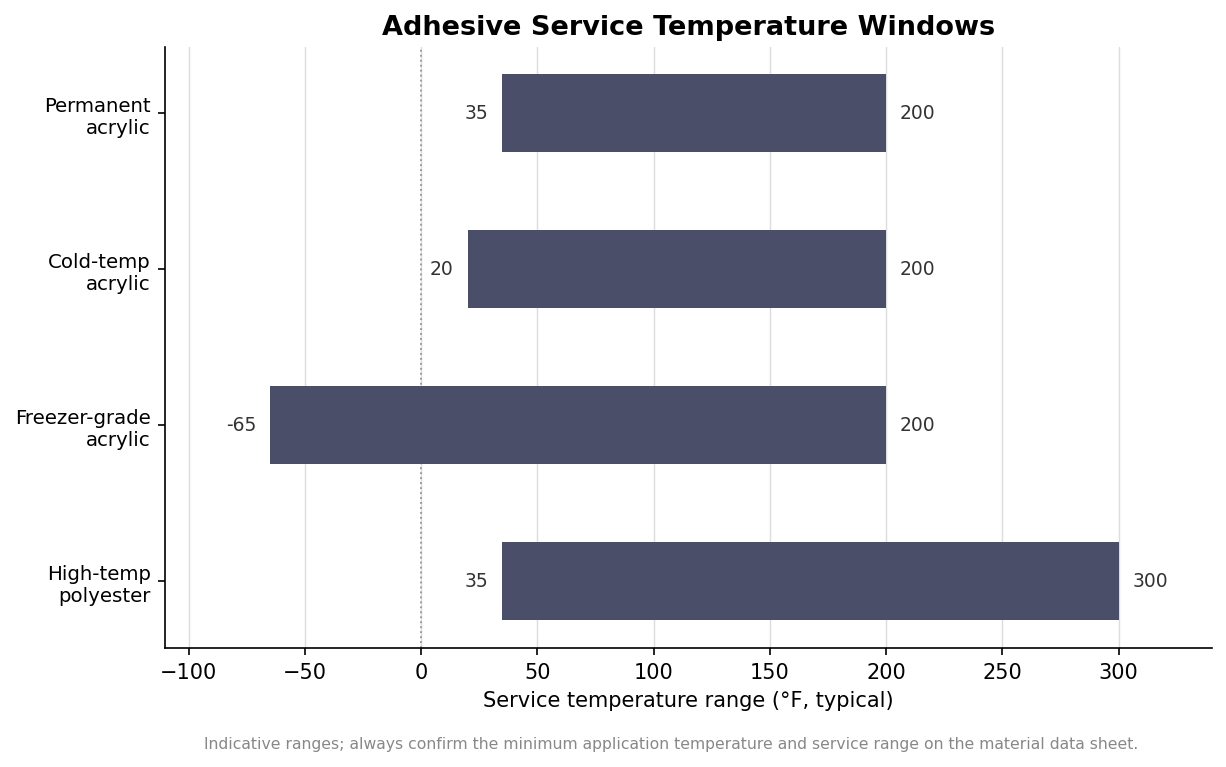
Heat is the mirror image. High-temperature adhesives serve continuously to around 300 degrees and tolerate brief peaks higher still, but they only make sense paired with a polyester face stock, since paper and BOPP will scorch or distort long before the adhesive gives out. These belong on oven-bound cookware, machinery near heat, engine-bay parts, and items that will be sterilized. Wet and oily surfaces deserve their own caution: even the right chemistry cannot bond through a film of moisture or lubricant, so surface preparation matters as much as adhesive choice when a container is damp or greasy at the point of labeling.
How to specify so the bond holds
Getting this right on an order comes down to describing the real conditions, not just the look. Tell your label supplier the exact container material, because “plastic bottle” could mean easy PET or difficult HDPE and the adhesive recommendation flips between them. State the temperature at which the label will be applied and the temperature range the product will live in, including any trip through a cooler or freezer. Note whether the surface is smooth or textured, curved or flat, and whether it may be wet or oily when labeled. Say whether the label must ever come off cleanly, since that single requirement rules permanent adhesives out.
Then give the bond time and a clean surface. Apply to a dry, dust-free container within the adhesive’s application-temperature window, and where you can, let the label cure for about 24 hours before the product meets its harshest conditions, especially before it enters a freezer. When the stakes are high, order a small quantity first and test it on the actual container in the actual environment for a few days rather than trusting a data sheet alone. The published application and service temperatures are a reliable starting point, but they are typical figures, so the material data sheet for the specific adhesive, and a short real-world test, are what turn a good guess into a label that stays exactly where you put it.
Leave a Reply