Category: Uncategorized

  • Cosmetic Label Requirements: What FDA Rules and MoCRA Put on Your Label

    Cosmetic Label Requirements: What FDA Rules and MoCRA Put on Your Label

    A beautiful label that skips a required element is still a non-compliant label, and for cosmetics the requirements are specific enough that brands trip over them all the time. Before you approve artwork for a skincare or beauty product sold in the United States, it helps to know exactly what has to appear, where it goes, and how small the type is allowed to be. This is a plain-English walkthrough of what federal rules ask for, plus what the Modernization of Cosmetics Regulation Act, known as MoCRA, has added.

    The two panels every cosmetic label is built around

    Federal labeling divides your container into two working areas. The principal display panel is the face a shopper sees first on the shelf. It has to carry a statement of identity, meaning the product name together with a description or illustration of what the product is, so a jar reads clearly as, say, a facial moisturizer rather than just a brand word. The principal display panel also carries the net quantity of contents. Everything else, including the ingredient list and the company’s contact details, can live on the information panel, which is any panel immediately to the right of the principal display panel or another surface designed for that copy. Getting this split right early prevents the common mistake of crowding required legal copy onto the front where it fights your branding.

    Net quantity, identity, and the business address

    The net quantity statement has real formatting rules. It belongs in the bottom area of the panel, set on a line generally parallel to the base the package rests on, and its type has to be sized to the panel. For solids and semisolids you use avoirdupois pounds and ounces; for liquids you use fluid ounces, pints, quarts, or gallons; and once a package holds at least a pound or a pint you express the larger measure in parentheses, as in sixteen ounces followed by one pound in parentheses. You may add metric units alongside. The minimum character height scales with the size of the principal display panel, which the chart below lays out.
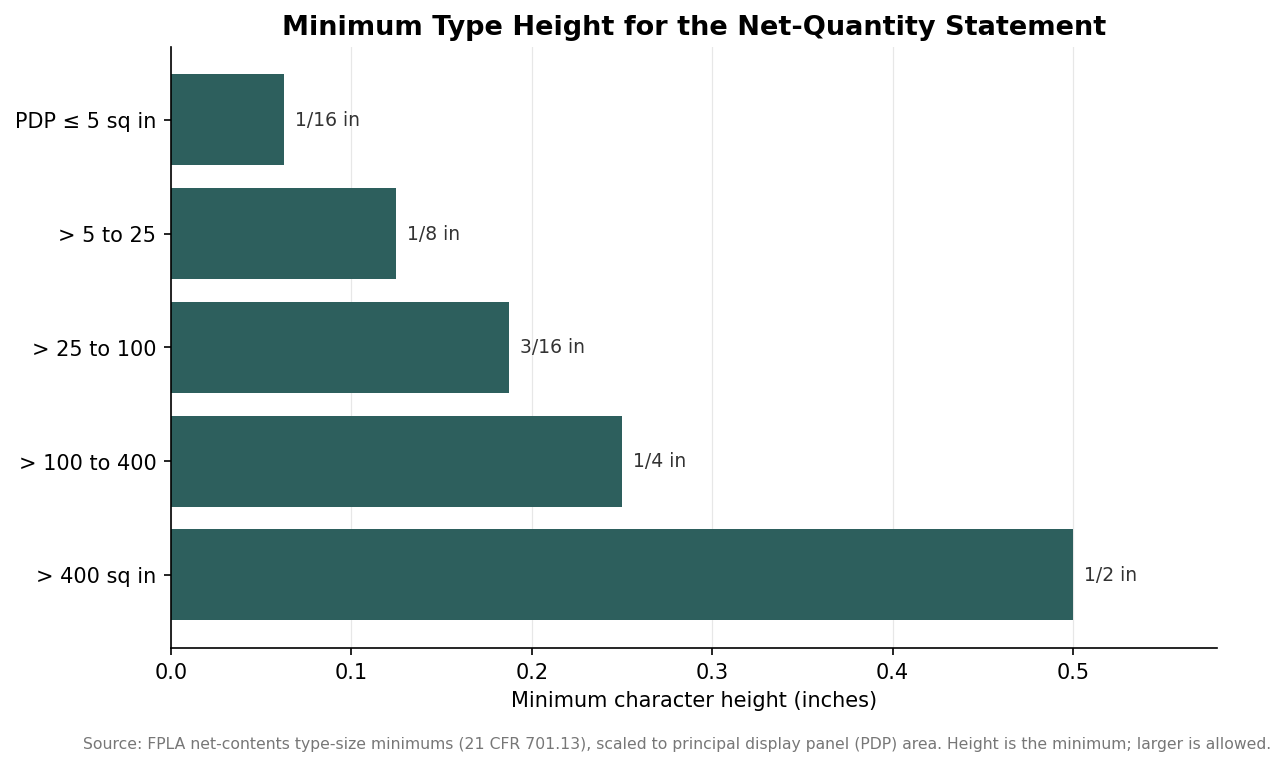
    Horizontal bar chart of minimum net-quantity statement type height by principal display panel area, from 1/16 inch to 1/2 inch
    Minimum type height for the net-quantity statement scales with panel size.

    On the information panel you need the name and place of business of the firm marketing the product, including a street address, city, state, and ZIP code. The street address can be dropped only if the firm is listed in a current phone or business directory. If the company selling the product did not make it, which is true for most small brands using a contract manufacturer, the address has to be qualified with a phrase like “Manufactured for” or “Distributed by.” Products of foreign origin also need a country-of-origin statement.

    The ingredient list: order, INCI, and fragrance

    Ingredients are declared in descending order of predominance, so the component you use most is listed first and the trace ingredients come last. There is a practical exception: color additives and any ingredients present at one percent or less do not have to follow strict order, which is why you often see colors grouped at the end. Names must follow the recognized nomenclature, in practice the INCI system, so “water” appears as aqua and botanical extracts appear under their standardized Latin-plus-common naming. Fragrance and flavor can be declared simply as fragrance or flavor rather than broken into constituents, and genuinely proprietary components can be grouped as “and other ingredients” after the disclosed ones. Type size matters here too: the ingredient declaration must be at least one-sixteenth of an inch tall, dropping to one thirty-second of an inch only on very small packages whose total surface is under twelve square inches.

    When your “cosmetic” is actually a drug

    This is the distinction that catches skincare brands most often. The moment a product makes a therapeutic claim or contains an active that changes the body’s structure or function, it is regulated as an over-the-counter drug in addition to being a cosmetic. Sunscreen, anti-acne treatments, antiperspirants, anti-dandruff shampoo, and anything promising to treat a condition all fall here. Those products need a Drug Facts panel and must list active ingredients first, ahead of the cosmetic ingredients, along with the drug’s uses, warnings, and directions. If your moisturizer advertises an SPF, you are labeling a drug, not just a cosmetic, and the artwork requirements expand accordingly. When a product’s safety has not been substantiated, federal rules even prescribe a specific warning that the safety of the product has not been determined.

    What MoCRA added, and what is still coming

    MoCRA layered new obligations on top of the long-standing rules. The label-facing one to plan for is a requirement to provide contact information through which the responsible person can receive adverse event reports, which in practice means a domestic address, a domestic phone number, or an electronic contact tied to the party accountable for the product. Products meant only for licensed professionals should also carry a clear professional-use statement while still meeting all the consumer requirements above. The change many brands ask about, individually naming fragrance allergens on the label, is authorized under MoCRA but has not yet been finalized as a binding federal rule, so United States labels are not currently required to list them. That is very different from the European Union and Canada, which already require named allergen disclosure and are expanding those lists, as the second chart shows. If you sell internationally, design your ingredient copy with that trajectory in mind rather than reprinting later.
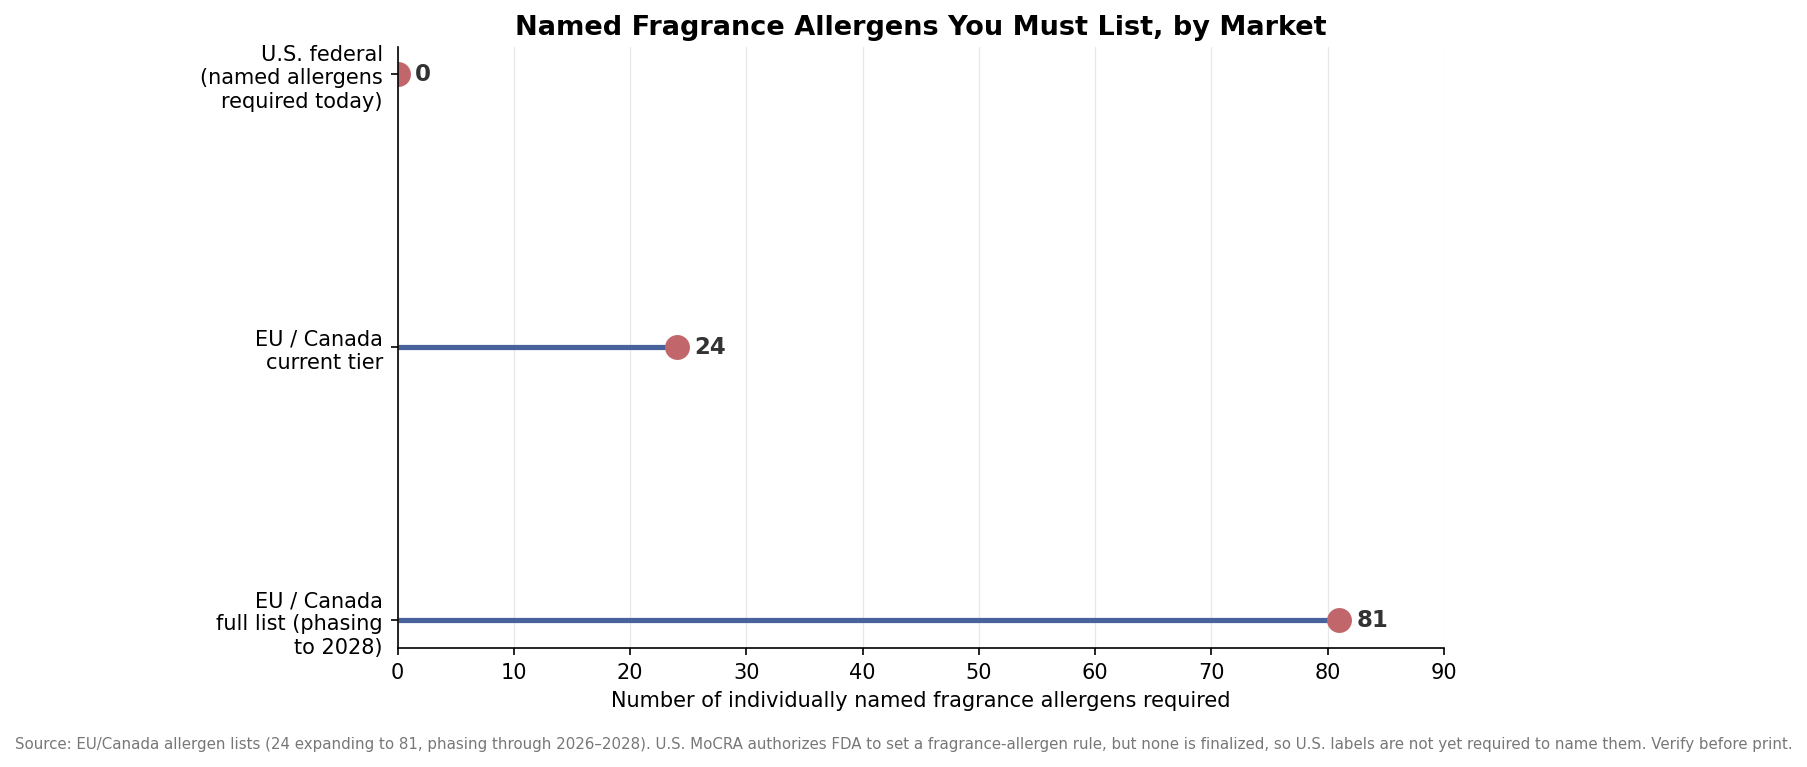
    Lollipop chart comparing named fragrance allergen disclosure counts: 0 required in the US federally, 24 and 81 in EU and Canada
    Named fragrance-allergen disclosure required by market; the US rule is not yet finalized.

    Two takeaways make the whole thing manageable. First, lay out the required elements before the visual design, not after, so legal copy has a home and a legible type size instead of being squeezed in at the proof stage. Second, decide honestly whether your claims push the product into drug territory, because that single question changes the entire panel structure. This overview covers the common cases, but requirements change and edge cases exist, so confirm the current FDA guidance or run your final artwork past a regulatory specialist before you commit a print run.
  • How Big Does a Barcode Need to Be on Your Label? UPC Sizing That Scans

    How Big Does a Barcode Need to Be on Your Label? UPC Sizing That Scans

    A barcode that will not scan is worse than no barcode at all: it stalls a checkout line, gets your product rejected by a retailer’s receiving team, and can force a relabel of the whole run. On a custom label, the barcode is the one element with hard, published tolerances, and shrinking it to fit a small bottle or squeezing it into a corner is where most avoidable failures come from. Here is how big a retail UPC actually needs to be, and the two details that quietly decide whether it reads.

    The nominal size and the range around it

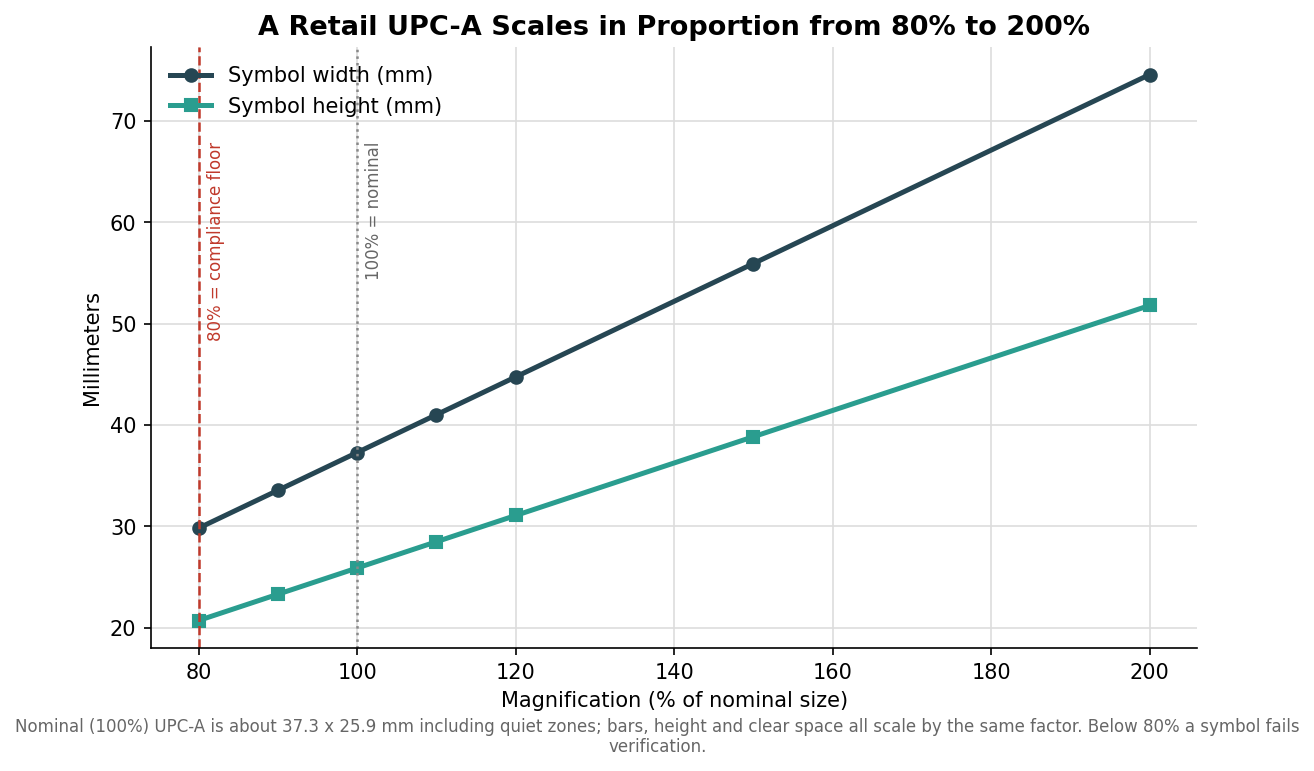
    The retail barcode most products carry is a UPC-A, and it has a defined nominal size at what the standard calls 100% magnification: about 37.3 mm wide and 25.9 mm tall, or roughly 1.47 by 1.02 inches, including the mandatory clear space on each side. From there the symbol can be scaled within an allowed magnification range of 80% to 200%. Everything scales together and in proportion, so bars, spaces, height, and clear space all grow or shrink by the same factor, which is why you cannot simply squash a barcode’s height to make it fit a thin label.

    Line chart of UPC-A barcode width and height in millimeters across magnifications from 80 to 200 percent
    A UPC-A scales in proportion from the 80% compliance floor through its 100% nominal size and up to 200%.

    At the small end, 80% is the compliance floor: a symbol printed smaller than that will fail a barcode verification report and is likely to be rejected by retailers who check. At 80% the symbol is roughly 29.8 mm wide. Most guidance recommends staying at 100% to 120% for anything sold through a general retail lane, because that is where point-of-sale scanners read fast and on the first pass, and the few extra millimeters buy you real reliability. Go bigger only when you have room; go smaller only when you have measured that it still scans.

    The two details that actually break scanning

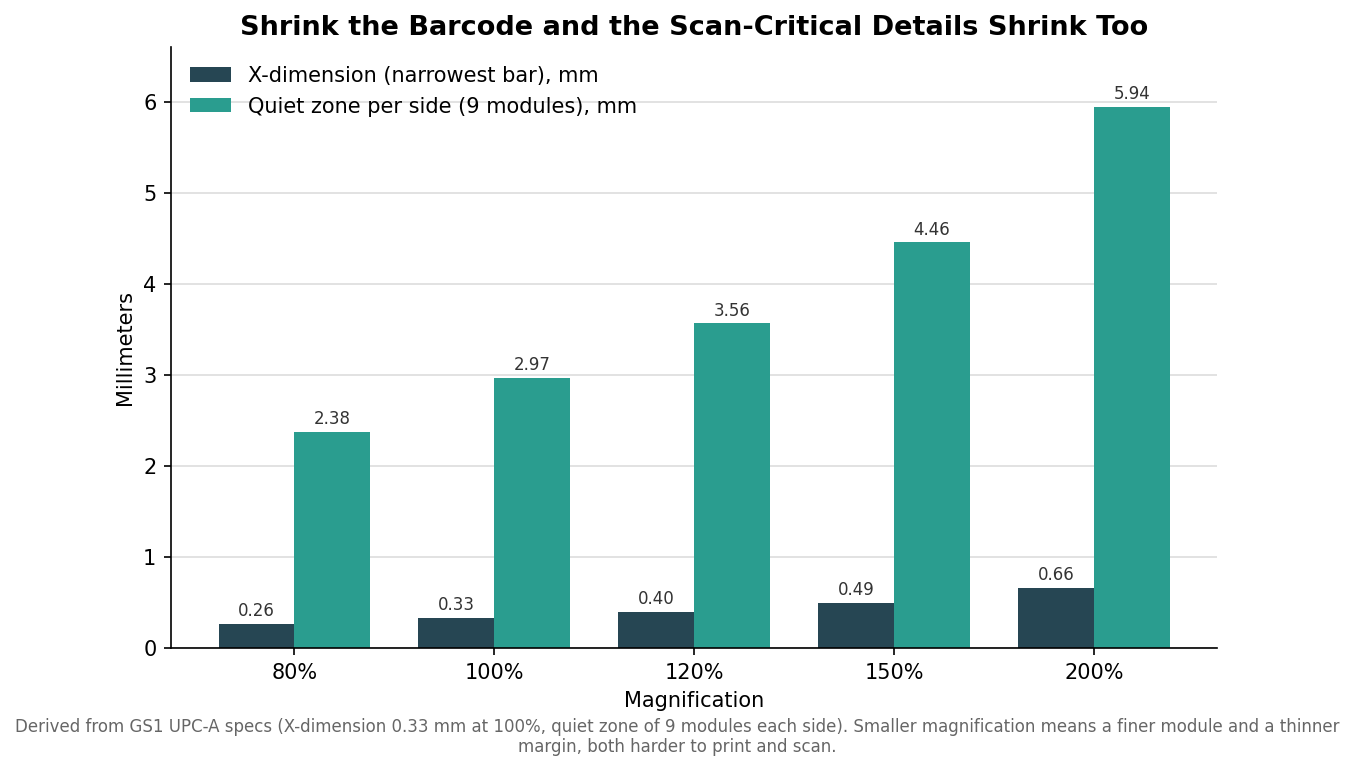
    Two features fail before the overall size looks obviously wrong, and both shrink when you scale the barcode down. The first is the X-dimension, the width of the narrowest bar or space, the module the whole code is built from. At 100% it is about 0.33 mm, and as magnification drops it drops with it. Once the X-dimension falls below what your printer can render cleanly, the bars blur into each other and the scan fails regardless of how the code looks to the eye.

    Grouped bar chart of UPC-A X-dimension and per-side quiet zone in millimeters by magnification
    The X-dimension and quiet zone shrink with the barcode, and both are what actually make a scan succeed or fail.

    The second is the quiet zone, the blank margin on each side of the bars. UPC-A requires at least nine modules of clear space on each side, which at 100% is roughly 3 mm, and it must stay empty, with no text, border, or artwork intruding. Designers lose more scans to a violated quiet zone than to almost anything else, because a tidy-looking layout that tucks the barcode against a fold, an edge, or a line of copy silently eats the margin the scanner needs. When you scale the barcode down, that margin shrinks too, so a small symbol is doubly unforgiving of a crowded layout.

    One more habit prevents reprints: keep the human-readable digits beneath the bars, and never let a design crop or delete them. Those numerals are the fallback a cashier keys in when a code will not scan, and a retailer can reject a symbol that has them trimmed off. If your products also sell outside North America, the equivalent international symbol is the EAN-13, the same barcode family at nearly the same nominal size and the same 80% to 200% range, so the sizing logic here carries over with only small differences in the clear-space rule.

    Print and material matter as much as size

    Size is necessary but not sufficient. Bars must be dark on a light background with strong contrast; a true black or dark blue on white or a light stock is safest, while red or warm-toned bars can read as blank to a red-laser scanner and should be avoided for the bars themselves. Print resolution matters at small sizes, since a 300 dpi press holds a crisp small barcode far better than a 203 dpi one, so if you are pushing toward the 80% end the equipment and the substrate both have to be up to it. Glossy and clear label films can throw glare that confuses a scanner, and busy or textured backgrounds cut contrast, so keep the barcode on a clean, matte, high-contrast patch even when the rest of the label is glossy or transparent.

    How to spec it so it scans the first time

    Decide the barcode size before you finalize the label layout, not after, because it sets a minimum footprint the rest of the design has to accommodate. Reserve a clean rectangle sized for at least 100% magnification with its full quiet zones intact, keep it on a light, matte area, and orient it so the bars run in the direction your labels unwind if you are printing on a roll. Ask your printer to run a barcode verification on the proof, not just a quick phone-app scan, because verification grades the code against the standard and catches the marginal X-dimension and contrast problems a lucky scan hides. If space is genuinely tight, talk to your printer about a smaller-footprint symbology or a rearranged layout rather than pushing the UPC below 80%.

    The goal is a code that reads on the first pass at every checkout, and that outcome is decided on the artwork, long before the labels are on the shelf. Get the size, the quiet zone, and the contrast right up front, verify the proof, and the barcode becomes the one part of the label you never have to think about again.

  • Choosing a Label Adhesive: Match the Stick to Your Surface and Conditions

    Choosing a Label Adhesive: Match the Stick to Your Surface and Conditions

    Most label failures are not print failures. The color is fine, the die-cut is clean, and yet the label lifts at a corner, slides on a squeeze bottle, or peels the moment a jar goes into a cooler. Nearly always the culprit is the adhesive, chosen as an afterthought once the artwork looked right. Adhesive is not a single product you either have or do not; it is a set of chemistries tuned for specific surfaces and conditions, and matching the right one to your container is what separates a label that survives the supply chain from one that arrives half off.

    Why labels fail: surface, temperature, and time

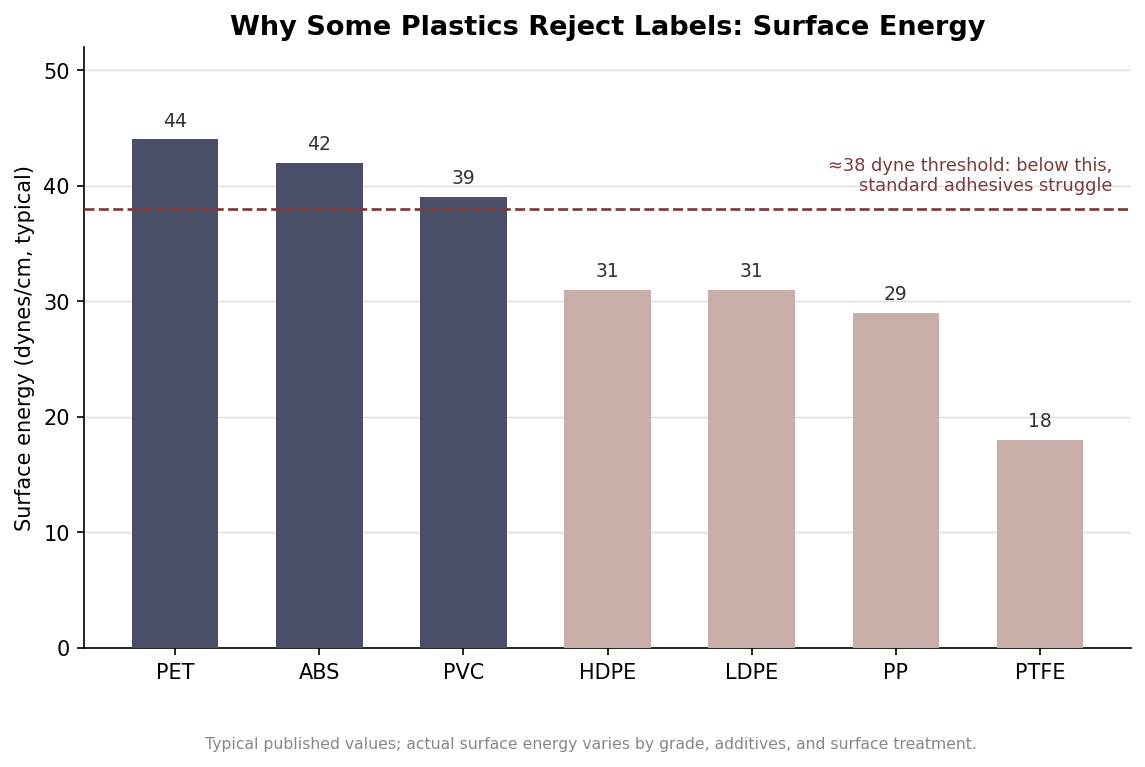
    Three variables decide whether a label holds. The first is surface energy, a measure of how readily a surface lets an adhesive wet out and grip it. High-energy surfaces such as glass and metal are easy to bond. Many common container plastics are the opposite: polypropylene sits around 29 dynes per centimeter and the polyethylenes around 31, well below the roughly 38-dyne mark where standard adhesives start to hold confidently. That is why a label that clings happily to a glass jar slides off an HDPE bottle of the same product. The values below are typical rather than exact, since grade, additives, and any surface treatment shift them, but the pattern is consistent.

    Bar chart of surface energy in dynes per centimeter for common plastics with a 38-dyne adhesion threshold line; HDPE, LDPE, PP and PTFE fall below it
    Surface energy of common plastics; those below about 38 dynes need a high-tack or rubber-based adhesive.

    The second variable is temperature, both when the label is applied and where the product lives afterward. Pressure-sensitive adhesives need enough warmth to flow and wet the surface at the moment of application; apply below an adhesive’s minimum application temperature and it never fully grabs, even if the freezer it later enters is rated fine. The third variable is time. Pressure-sensitive bonds are not final on contact. Initial tack happens immediately, but the bond keeps building for roughly 24 to 72 hours as the adhesive flows into the surface, which is why a label that looks stuck at the filling line can still be repositioned an hour later and only reaches full strength a day or two on.

    The everyday adhesives

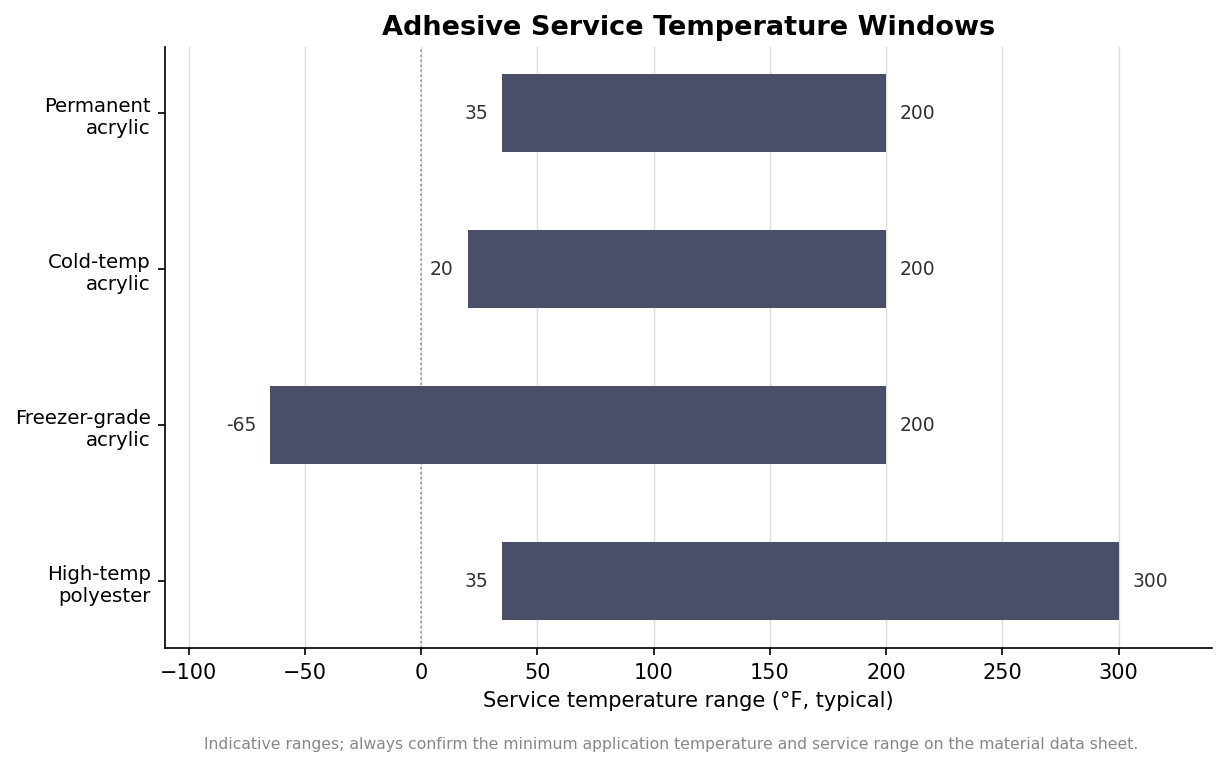
    Permanent acrylic is the default for good reason. It applies in a normal room, roughly 40 to 100 degrees Fahrenheit, serves from about 35 to 200 degrees, and it is UV-stable, ages well, and resists chemicals. On glass, metal, and smooth higher-energy plastics it is the sensible all-rounder for retail products that live indoors or in ambient conditions. Most bottle, jar, and box labels start here and only move off it for a specific reason.

    Removable acrylic is built to come away cleanly, which makes it right for price tags, promotional overlays, returnable containers, and anything a customer or warehouse will peel. The catch that surprises people is that removable adhesives bond more strongly the longer they sit and the warmer they get, so a label meant to lift off after a week may fight you after a month in a hot store. When clean removal matters, test it at the age and temperature it will actually face. High-tack acrylic or rubber-based adhesive is the answer to the surface-energy problem above: it is formulated to grab low-energy plastics like polyethylene and polypropylene, textured and recycled substrates, and rough surfaces where a standard adhesive simply slides. Rubber-based permanents push this further with very high initial tack for the most stubborn plastics and for cold, wet, or slightly oily surfaces, at the cost of less UV stability, since they can yellow over time.

    Cold, hot, wet, and oily: the specialty adhesives

    When the environment leaves the ordinary range, the adhesive has to change with it. Cold-temperature acrylic applies down to around 25 to 35 degrees and serves from about 20 degrees upward, which suits refrigerated containers, chilled-beverage displays, and surfaces prone to condensation. It is built for refrigeration, not freezing. For true frozen goods you need a freezer-grade adhesive that can be applied at or near zero degrees Fahrenheit and stays flexible and tacky in service down toward minus 65, without going brittle and shedding the label. Cold-chain pharmaceuticals and frozen food both depend on it, and the temperature windows below show how much wider that span is than a standard permanent.

    Horizontal range chart of service temperature windows for permanent, cold-temp, freezer-grade, and high-temperature label adhesives
    Typical service temperature windows by adhesive type; freezer-grade spans far colder than a standard permanent.

    Heat is the mirror image. High-temperature adhesives serve continuously to around 300 degrees and tolerate brief peaks higher still, but they only make sense paired with a polyester face stock, since paper and BOPP will scorch or distort long before the adhesive gives out. These belong on oven-bound cookware, machinery near heat, engine-bay parts, and items that will be sterilized. Wet and oily surfaces deserve their own caution: even the right chemistry cannot bond through a film of moisture or lubricant, so surface preparation matters as much as adhesive choice when a container is damp or greasy at the point of labeling.

    How to specify so the bond holds

    Getting this right on an order comes down to describing the real conditions, not just the look. Tell your label supplier the exact container material, because “plastic bottle” could mean easy PET or difficult HDPE and the adhesive recommendation flips between them. State the temperature at which the label will be applied and the temperature range the product will live in, including any trip through a cooler or freezer. Note whether the surface is smooth or textured, curved or flat, and whether it may be wet or oily when labeled. Say whether the label must ever come off cleanly, since that single requirement rules permanent adhesives out.

    Then give the bond time and a clean surface. Apply to a dry, dust-free container within the adhesive’s application-temperature window, and where you can, let the label cure for about 24 hours before the product meets its harshest conditions, especially before it enters a freezer. When the stakes are high, order a small quantity first and test it on the actual container in the actual environment for a few days rather than trusting a data sheet alone. The published application and service temperatures are a reliable starting point, but they are typical figures, so the material data sheet for the specific adhesive, and a short real-world test, are what turn a good guess into a label that stays exactly where you put it.

  • How to Spec Custom Candle Labels: Warnings, Net Weight, and Materials

    How to Spec Custom Candle Labels: Warnings, Net Weight, and Materials

    A candle label has two jobs, and most first orders only do one of them. It has to sell the candle on a crowded shelf, and it has to carry the safety and content information that federal rules and retailers expect. Get the first part right and skip the second, and you can end up reprinting a run, getting pulled from a marketplace, or peeling warped labels off warm jars. Here is how to write a candle label spec that covers both, in the order you actually make the decisions.

    Start With the Warning Block, Because It Is Not Optional in Practice

    The candle fire-safety warning comes from ASTM F2058, the consensus standard for candle fire-safety labeling. It is technically a voluntary standard, but in practice it functions as a requirement: major retailers and online marketplaces expect it, and skipping it is the fastest way to get a listing rejected or a wholesale account declined. The block has a fixed anatomy. The signal word WARNING appears in bold at the top, followed by three safety statements that can be shown as text or as approved pictograms: burn the candle within sight, keep it away from anything that catches fire, and keep it away from children. Placement is flexible, which is why most makers put the full block on the base of the vessel and keep the front label clean.

    Design the warning block as its own artwork element early, not as an afterthought squeezed in at proof stage. If you plan to use the pictogram versions to save space, confirm your printer has the approved symbol set, because a reddrawn or stylized icon is not the same as the standardized one.

    Get the Net Weight and Identity Right

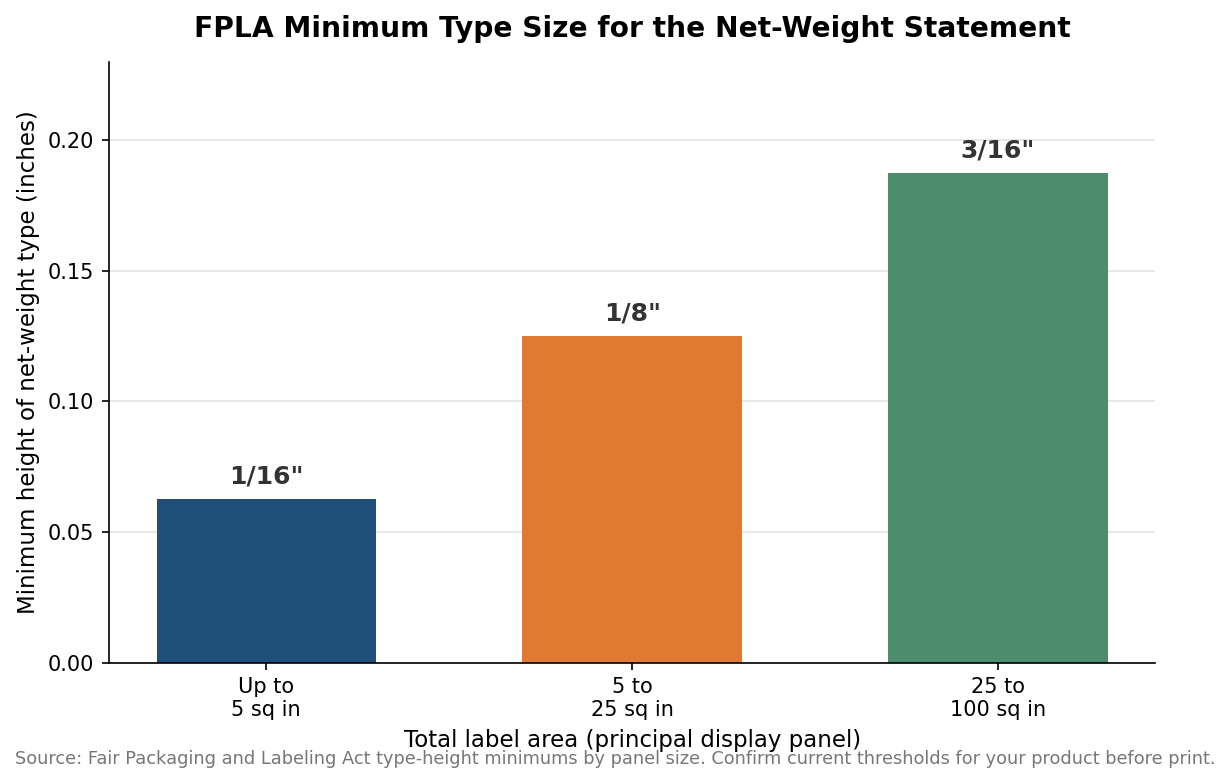
    The Fair Packaging and Labeling Act governs the rest of the required content, and it is federal law rather than a voluntary standard. You need a statement of identity, meaning a plain product name such as “scented candle” or “soy candle,” and you need the net weight of the finished candle, wax and wick included, shown in both US customary and metric units. The net weight has to sit in the bottom thirty percent of the principal display panel, and it has a minimum type size that scales with the label.

    Bar chart of FPLA minimum net-weight type height: 1/16 inch, 1/8 inch, and 3/16 inch by label area
    The required net-weight type size grows with the label, and designers often set it too small.

    On a small label up to five square inches, the net-weight type has to be at least one-sixteenth of an inch tall; between five and twenty-five square inches it climbs to one-eighth of an inch; and from twenty-five to one hundred square inches it reaches three-sixteenths of an inch. Designers routinely set this text too small to look tidy, then have to redo the layout. Set it at the minimum from the start and build the composition around it. You also need the name and location of the manufacturer or distributor; a town and state will do if a phone number or website is present, and if you outsource production you use “manufactured for” or “distributed by” language.

    Choose a Material That Survives Wax, Oil, and Heat

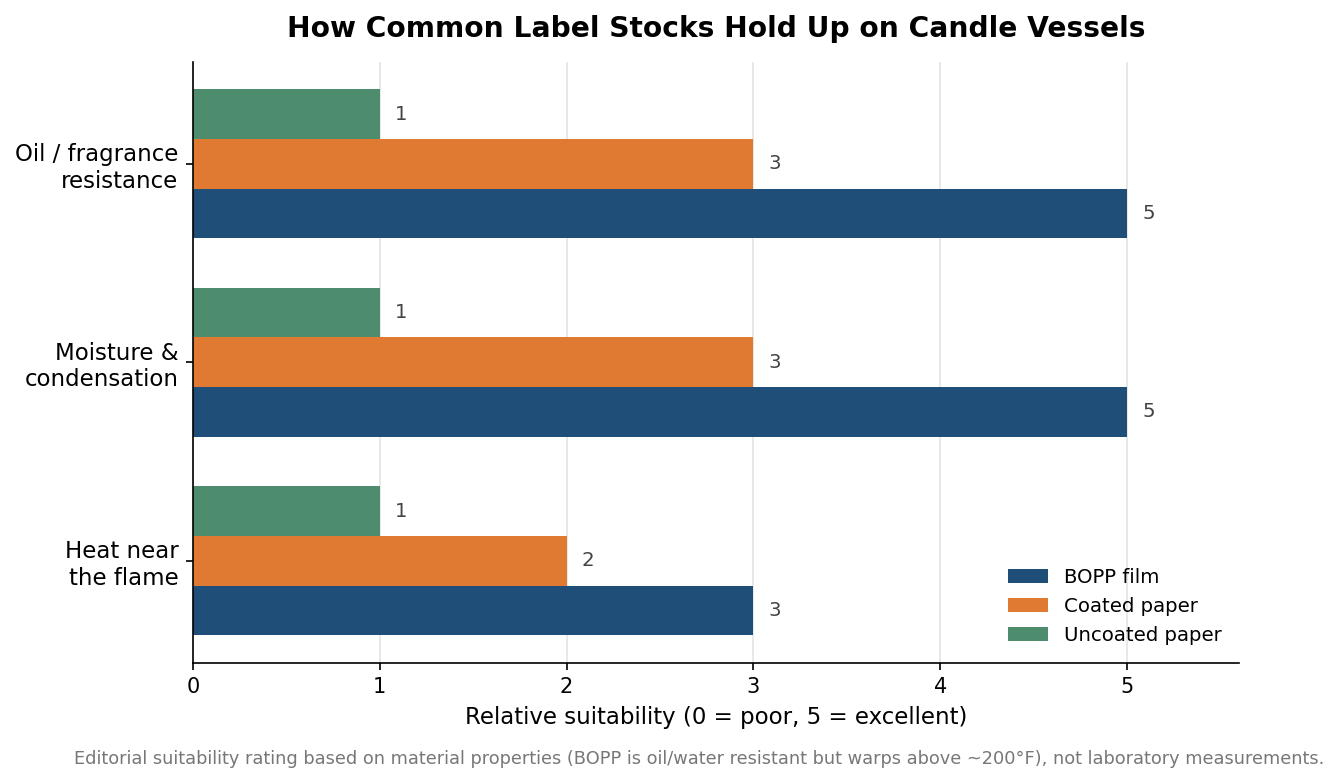
    Candle vessels are a hostile environment for a label. Fragrance oils get on the glass during pouring and handling, finished candles sweat in warm rooms, and the upper vessel gets genuinely hot while burning. That rules out bare uncoated paper for most applications, because it wrinkles, smudges, and lifts when it meets oil or condensation. The workhorse choice is BOPP film, a biaxially oriented polypropylene that shrugs off water and oil, resists wrinkling when wet, and bonds well to curved glass with the right adhesive.

    Grouped bar chart rating BOPP film, coated paper, and uncoated paper for oil, moisture, and heat resistance on candle vessels
    BOPP film leads on oil and moisture; keep any stock away from the hottest part of the jar.

    BOPP has one real limit worth designing around: it starts to warp above roughly two hundred degrees Fahrenheit, so on a vessel that runs hot near the flame you want the label low on the jar rather than up near the rim. Coated paper sits in the middle; it gives you the premium matte look many candle brands want and holds up far better than uncoated stock, but it still trails film on oil and moisture resistance. If the brand look demands paper, specify a coated or laminated paper and keep it away from the hottest zone. Whatever the face stock, ask for an adhesive rated for curved glass, and if any of your candles ship or store cold, confirm the adhesive is rated for low temperatures so labels do not lift in transit.

    Size and Place the Label for a Round Vessel

    Curved surfaces punish oversized labels. A label that wraps too far around a jar will pucker at the trailing edge, and one that is too tall relative to the straight section of the vessel will bridge over the curve and tunnel. As a working rule, keep the label height inside the truly straight portion of the glass and leave the wrap short of a full circumference unless you are intentionally doing a full wrap with a seam. For a standard straight-sided tumbler, a front label plus a separate base label for the warning block is the most forgiving layout. Order a small proof quantity and apply it to the actual production vessel before committing to a full run, because a design that looks right flat can misbehave on glass.

    Turn It Into a Spec Sheet

    Pulling it together, a sound candle label order specifies the face material and finish, the adhesive and its temperature rating, the die-cut size matched to the vessel’s straight section, and a proof of the warning block and net-weight statement at their real printed sizes. As an indicative planning figure, custom die-cut candle labels on film commonly run somewhere in the range of roughly ten to forty cents per label depending on size, quantity, and finish, with minimum orders often starting around two hundred fifty to five hundred pieces and production lead times frequently near one to two weeks after proof approval; treat those as starting points to confirm with your supplier rather than fixed quotes. Nail the compliance content once, save it as a reusable artwork layer, and every future scent variation becomes a quick swap of the front panel rather than a fresh compliance review.

  • How Many Custom Labels Should You Order? โ€” Custom Labels Co

    Home › Blog › How Many Custom Labels Should You Order?

    Ordering

    How Many Custom Labels Should You Order?

    07/02/2026

    Ordering custom labels for the first time, most brands either overbuy on a design theyโ€™ll tweak or underbuy and miss the volume price โ€” and both cost money. Because printed labels carry a setup cost, the per-unit price drops sharply with quantity, so the right order size is as much about economics as it is about how many bottles or jars youโ€™ll fill.

    Hereโ€™s how to size an order once you separate your program into its real needs.

    First run: order to a real tier

    For a first product run, donโ€™t order the bare minimum โ€” setup dominates at low volumes, so the per-label price at 250 can be several times the price at 2,500. If the design is final, ordering up one tier usually costs only marginally more total while cutting your per-unit cost sharply. If the design might change, order a small proof run first.

    Replenishment: base it on fill rate

    Tie your quantity to how fast you fill product โ€” order 8โ€“12 weeks of labels and reorder at about 3 weeks of cover so a reprint lands before you run out. Because we keep your dieline and stock on file, reorders are fast and match exactly.

    Multi-SKU: consolidate to share setup

    If you run several SKUs, order them together. Combining designs into one production window shares setup and hits a higher combined tier, which lowers the price on every label at once.

    StageStarting quantityWhy
    Design finalOrder to a real tier (often 2,500+)Setup cost dominates at low volume
    Design uncertainSmall proof run firstValidate before scaling
    Replenishment8โ€“12 weeks of fill rateReorder at ~3 weeks cover
    Multi-SKUCombine designs in one runShare setup, hit a higher tier
    Key takeaway

    The single biggest lever on per-label cost is quantity: once your artwork is final, ordering up one tier usually pays for itself immediately.

    Tell us your product, size, and volume and weโ€™ll show you exactly where the price tiers fall โ€” with a free mockup, within one business day.

    More posts

  • Roll vs. Sheet Labels: Which Should You Choose? โ€” Custom Labels Co

    Home › Blog › Roll vs. Sheet Labels: Which Should You Choose?

    Buyer Guides

    Roll vs. Sheet Labels: Which Should You Choose?

    06/18/2026

    Labels come two ways โ€” wound on a roll or laid out on flat sheets โ€” and the right choice comes down to how you apply them. Get it right and your labeling is fast and clean; get it wrong and youโ€™re fighting a format that doesnโ€™t fit your process.

    Hereโ€™s how to choose by application, not by default.

    Choose rolls for machines and volume

    If you apply labels with an applicator or bottling line, you need rolls wound to your machineโ€™s core and orientation. Rolls are also the most economical format at volume and the standard for high-throughput food, beverage, and cosmetics packaging.

    Choose sheets for hand application and short runs

    If you apply by hand, run short or variable batches, or juggle many SKUs, flat sheets are simpler โ€” they store flat, peel easily, and let you combine several designs in one order with no plate cost.

    A quick decision rule

    Machine application or high volume, choose rolls. Hand application, small batches, or lots of SKUs, choose sheets. Many growing brands start on sheets and move to rolls as volume and automation increase.

    FactorRollsSheets
    ApplicationMachine / applicatorBy hand
    Best volumeMedium to very highLow to medium
    Multi-SKUOne design per rollSeveral per sheet
    StorageWound rollsFlat sheets
    Key takeaway

    Rule of thumb: if a machine applies your labels, order rolls; if you apply by hand or run small batches, order sheets.

    Tell us how you apply your labels and weโ€™ll recommend the right format and mock it up โ€” free, within one business day.

    More posts

  • Choosing a Label Material: BOPP vs. Paper vs. Clear โ€” Custom Labels Co

    Home › Blog › Choosing a Label Material: BOPP vs. Paper vs. Clear

    Buyer Guides

    Choosing a Label Material: BOPP vs. Paper vs. Clear

    06/04/2026

    The material is the most important label decision youโ€™ll make, because it determines whether the label survives its environment and how the product reads on the shelf. The three common families โ€” durable BOPP, coated or kraft paper, and clear film โ€” each fit a different job.

    Hereโ€™s how to match the stock to the product.

    BOPP for anything that gets wet

    White or clear BOPP is a waterproof, tear-resistant film that survives the fridge, the ice bucket, and the shower without wrinkling. Itโ€™s the right call for beverages, bath and body, and any product exposed to moisture or oils โ€” the durable default for product labeling.

    Paper and kraft for dry goods and a natural look

    Coated paper prints bright and crisp for dry-goods packaging, and uncoated kraft gives an artisan, matte, hand-finished look that eco and small-batch brands want. Both cost less than film, but neither is built to get wet โ€” reserve them for dry environments.

    Clear film for the no-label look

    Clear BOPP makes your design appear printed directly on the glass, which reads premium on bottles and jars. It needs a white underprint behind opaque colors to stay true, and itโ€™s waterproof like white BOPP.

    MaterialDurabilityBest for
    White BOPPWaterproof, oil-proofBeverages, beauty, wet goods
    Clear BOPPWaterproof, no-label lookPremium bottles & jars
    Paper / kraftDry-goods, matte lookArtisan & dry packaging
    Key takeaway

    Rule of thumb: if the label will get wet, choose BOPP; if itโ€™s a dry-goods or artisan product, paper or kraft is cheaper and warmer.

    Tell us your product and container and weโ€™ll recommend the right material and mock it up โ€” free, within one business day.

    More posts

  • Are Your Labels Waterproof? Durability for Bottles & Jars โ€” Custom Labels Co

    Home › Blog › Are Your Labels Waterproof? Durability for Bottles & Jars

    Product & Care

    Are Your Labels Waterproof? Durability for Bottles & Jars

    05/21/2026

    The most common label failure is a lifted edge or a smeared print on a bottle that got cold or wet โ€” and it almost always traces back to the wrong material or adhesive. A waterproof label is a spec, not luck, and itโ€™s worth understanding before you order.

    Hereโ€™s what actually makes a label survive moisture and cold.

    Film, adhesive, and laminate together

    A durable product label is a waterproof BOPP or polyester film, a cold- and moisture-rated adhesive that resists edge-lift, and a protective laminate over the print. All three matter: the film keeps water out, the adhesive keeps edges down in the cold, and the laminate protects the ink from scuffing and oils.

    Match the adhesive to the environment

    A label headed for the freezer, the ice bucket, or the shower needs an adhesive rated for that condition. A standard adhesive thatโ€™s fine on a dry box will lift on a cold, wet bottle โ€” so always tell us the environment and weโ€™ll spec the right one.

    Laminate protects the print

    Even a waterproof film will scuff if the ink is exposed. A gloss or matte laminate seals the print so it survives handling, ice, and oils โ€” essential for beverages, bath products, and anything that gets handled wet.

    EnvironmentMaterial + adhesiveResult
    Fridge / ice bucketBOPP + cold-rated adhesiveNo edge lift
    Shower / bathBOPP + moisture adhesive + laminateStays crisp
    Dry goodsPaper, standard adhesiveFine indoors
    Key takeaway

    A label that survives the fridge and shower is worth far more than a cheaper one that lifts and smears on the first cold bottle.

    Tell us your container and environment and weโ€™ll spec a waterproof label and adhesive โ€” with a free mockup within one business day.

    More posts

  • Foil, Emboss & Specialty Finishes: Making a Label Look Premium โ€” Custom Labels Co

    Home › Blog › Foil, Emboss & Specialty Finishes: Making a Label Look Premium

    Design & Artwork

    Foil, Emboss & Specialty Finishes: Making a Label Look Premium

    05/07/2026

    Two products can have the same shape and the same price, and the one with a foil-stamped, embossed label will feel more expensive every time. Specialty finishes are the most reliable way to raise a productโ€™s perceived value โ€” if you use them with restraint.

    Hereโ€™s what each finish does and how to deploy it.

    Foil stamping for shine and status

    Metallic foil โ€” gold, silver, rose, or custom โ€” reflects light and instantly signals premium. Use it on a crest, a wordmark, or a thin border rather than the whole label; a little foil reads refined, while a lot reads gaudy.

    Emboss and spot gloss for touch

    Embossing raises an element off the surface and spot gloss adds a wet shine over a matte background, both creating tactile and visual contrast. On a soft-touch matte stock, a spot-gloss logo feels expensive the moment itโ€™s picked up.

    Restraint is the strategy

    The premium look comes from contrast, not quantity. Pick one hero element to elevate โ€” usually the logo โ€” finish the rest cleanly, and let the special effect carry the weight. Weโ€™ll help you place finishes so they lift the product instead of cluttering it.

    FinishEffectUse on
    Foil stampMetallic shine, statusLogo, crest, border
    EmbossRaised, tactileLogo or seal
    Spot glossWet shine on matteHero element
    Key takeaway

    Restraint is the whole strategy: one foiled or embossed hero element on a clean label reads premium; covering the label in effects reads cheap.

    Tell us your product and weโ€™ll mock up a premium finish that fits your brand โ€” free, within one business day.

    More posts

  • How to Set Up Label Artwork & Dielines for Print โ€” Custom Labels Co

    Home › Blog › How to Set Up Label Artwork & Dielines for Print

    Design & Artwork

    How to Set Up Label Artwork & Dielines for Print

    04/23/2026

    A crisp label starts with a correctly built file, not with the printer. Setting up artwork and a dieline right takes a few minutes and avoids a round of revisions โ€” and if youโ€™d rather not, our designers will handle it for you free.

    Hereโ€™s the short prepress checklist we use.

    Start with vector art

    Vector files (AI, EPS, SVG, or PDF) scale to any size with sharp edges and give a clean cut. If you only have a raster image, provide it at 300 DPI at final size โ€” or send whatever you have and weโ€™ll recreate it print-ready at no charge.

    Set the dieline and bleed

    A dieline is the exact cut shape of the label, drawn as a separate vector path. Extend your background about an eighth of an inch past the dieline (bleed) so no white slivers show after cutting, and weโ€™ll cut precisely to the line.

    Keep a safe margin and mind the wrap

    Keep important text and logos about an eighth of an inch inside the cut so nothing critical gets trimmed, and for cylindrical containers, account for the curve and overlap seam so your design lands where you expect on the bottle.

    ElementSpecWhy
    File typeVector (AI/EPS/SVG/PDF)Sharp at any size, clean cut
    DielineSeparate vector pathExact cut shape
    Bleed~0.125 in past dielineNo white edges
    Safe margin~0.125 in inside cutNothing important trimmed
    Key takeaway

    No print-ready file? Donโ€™t worry about any of it โ€” send what you have and our designers will build the dieline and set it up free before you approve.

    Send your artwork and container in any format and weโ€™ll return a print-ready, proofed mockup within one business day โ€” revisions always free.

    More posts