A candle label has two jobs, and most first orders only do one of them. It has to sell the candle on a crowded shelf, and it has to carry the safety and content information that federal rules and retailers expect. Get the first part right and skip the second, and you can end up reprinting a run, getting pulled from a marketplace, or peeling warped labels off warm jars. Here is how to write a candle label spec that covers both, in the order you actually make the decisions.
Start With the Warning Block, Because It Is Not Optional in Practice
The candle fire-safety warning comes from ASTM F2058, the consensus standard for candle fire-safety labeling. It is technically a voluntary standard, but in practice it functions as a requirement: major retailers and online marketplaces expect it, and skipping it is the fastest way to get a listing rejected or a wholesale account declined. The block has a fixed anatomy. The signal word WARNING appears in bold at the top, followed by three safety statements that can be shown as text or as approved pictograms: burn the candle within sight, keep it away from anything that catches fire, and keep it away from children. Placement is flexible, which is why most makers put the full block on the base of the vessel and keep the front label clean.
Design the warning block as its own artwork element early, not as an afterthought squeezed in at proof stage. If you plan to use the pictogram versions to save space, confirm your printer has the approved symbol set, because a reddrawn or stylized icon is not the same as the standardized one.
Get the Net Weight and Identity Right
The Fair Packaging and Labeling Act governs the rest of the required content, and it is federal law rather than a voluntary standard. You need a statement of identity, meaning a plain product name such as “scented candle” or “soy candle,” and you need the net weight of the finished candle, wax and wick included, shown in both US customary and metric units. The net weight has to sit in the bottom thirty percent of the principal display panel, and it has a minimum type size that scales with the label.
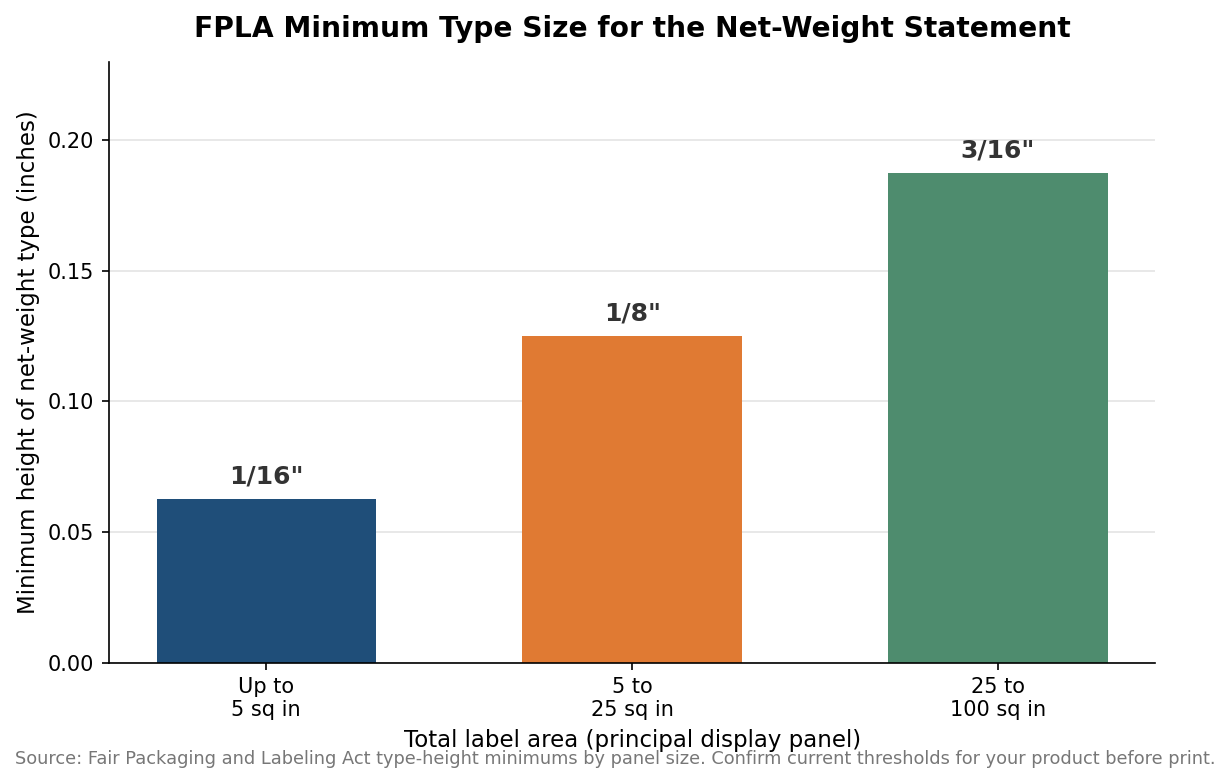
On a small label up to five square inches, the net-weight type has to be at least one-sixteenth of an inch tall; between five and twenty-five square inches it climbs to one-eighth of an inch; and from twenty-five to one hundred square inches it reaches three-sixteenths of an inch. Designers routinely set this text too small to look tidy, then have to redo the layout. Set it at the minimum from the start and build the composition around it. You also need the name and location of the manufacturer or distributor; a town and state will do if a phone number or website is present, and if you outsource production you use “manufactured for” or “distributed by” language.
Choose a Material That Survives Wax, Oil, and Heat
Candle vessels are a hostile environment for a label. Fragrance oils get on the glass during pouring and handling, finished candles sweat in warm rooms, and the upper vessel gets genuinely hot while burning. That rules out bare uncoated paper for most applications, because it wrinkles, smudges, and lifts when it meets oil or condensation. The workhorse choice is BOPP film, a biaxially oriented polypropylene that shrugs off water and oil, resists wrinkling when wet, and bonds well to curved glass with the right adhesive.
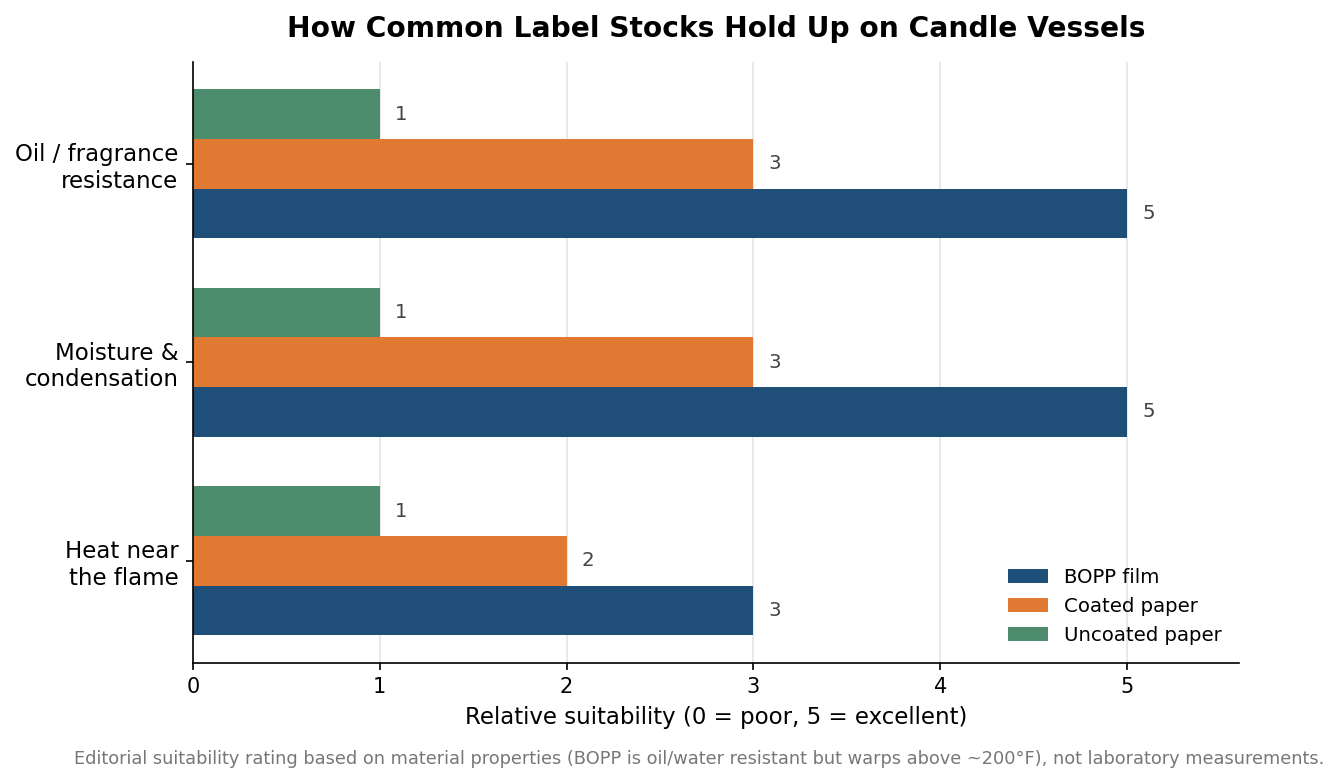
BOPP has one real limit worth designing around: it starts to warp above roughly two hundred degrees Fahrenheit, so on a vessel that runs hot near the flame you want the label low on the jar rather than up near the rim. Coated paper sits in the middle; it gives you the premium matte look many candle brands want and holds up far better than uncoated stock, but it still trails film on oil and moisture resistance. If the brand look demands paper, specify a coated or laminated paper and keep it away from the hottest zone. Whatever the face stock, ask for an adhesive rated for curved glass, and if any of your candles ship or store cold, confirm the adhesive is rated for low temperatures so labels do not lift in transit.
Size and Place the Label for a Round Vessel
Curved surfaces punish oversized labels. A label that wraps too far around a jar will pucker at the trailing edge, and one that is too tall relative to the straight section of the vessel will bridge over the curve and tunnel. As a working rule, keep the label height inside the truly straight portion of the glass and leave the wrap short of a full circumference unless you are intentionally doing a full wrap with a seam. For a standard straight-sided tumbler, a front label plus a separate base label for the warning block is the most forgiving layout. Order a small proof quantity and apply it to the actual production vessel before committing to a full run, because a design that looks right flat can misbehave on glass.
Turn It Into a Spec Sheet
Pulling it together, a sound candle label order specifies the face material and finish, the adhesive and its temperature rating, the die-cut size matched to the vessel’s straight section, and a proof of the warning block and net-weight statement at their real printed sizes. As an indicative planning figure, custom die-cut candle labels on film commonly run somewhere in the range of roughly ten to forty cents per label depending on size, quantity, and finish, with minimum orders often starting around two hundred fifty to five hundred pieces and production lead times frequently near one to two weeks after proof approval; treat those as starting points to confirm with your supplier rather than fixed quotes. Nail the compliance content once, save it as a reusable artwork layer, and every future scent variation becomes a quick swap of the front panel rather than a fresh compliance review.
Leave a Reply